We love Mexican food. LOVE IT! Going out to eat though is pricey. So I have been working on recipes to make our favorites at home.
This last week I made Fajitas. SO GOOD! I didn't take a picture, but I should have. On my iron skillet it could have passed for a dish from our favorite Mexican restaurant.
They are super easy.
Fajita Seasoning:
1 Tbsp Cornstarch
2 tsp Chili Powder
1 tsp salt
1 tsp paprika
1 tsp sugar
1 tsp Onion powder
1/4 tsp cayenne pepper
1 tsp cumin
Mix together. Makes just over 3 Tbsp. of seasoning. I used only half of it on our Fajitas.
Cut 2 chicken breasts, or steak into thin slices and toss with seasoning
Slice the following into thin slices
2 green peppers
1 onion
1 tomato
Heat an iron skillet over medium high heat. Once the skillet it hot toss the seasoned meat and veggies into the skillet. Stir frequently to get everything cooked through.
Serve on flour shells, with salsa, sour cream, and guacamole.
This made enough for 4 servings for us.
and was SUPER GOOD!
Have blessed FOCUSed day!

Just a little bit about things I love, things I do, and a look at our messy allergy life.
Showing posts with label food friday. Show all posts
Showing posts with label food friday. Show all posts
Friday, January 31, 2014

Friday, January 17, 2014
Food Talk Friday
I can't believe it is Friday again! Where does the time go? So I have the recipe for you for the Sloppy Tamale Pie. It is easy and delicious!
This serves approximately 6 and can be done either on the stove or in the crock pot.
1 lb. ground meat
1 carrot shredded
1 zucchini shredded
1 onion chopped
2 cups frozen corn
1 can sliced black olives (optional)
1 packet taco seasoning
2-15 oz cans tomato sauce
Brown meat and veggies. Drain. Add all ingredients to pot or crock pot. Cook on medium til heated through, or in crockpot on low 5-6 hours or on high 3-4 hours.
(You can also brown the meat/veggies, cool then toss all the ingredients in a freezer bag and put it in the freezer. When you want to make it, thaw it, then put it in the crockpot. Easy Peasy!
Great served with cornbread, or with rice.
Sorry I don't have any pictures, I'll be honest it isn't the prettiest thing on the plate, but it is so good!
Have a blessed FOCUSed day!
This serves approximately 6 and can be done either on the stove or in the crock pot.
1 lb. ground meat
1 carrot shredded
1 zucchini shredded
1 onion chopped
2 cups frozen corn
1 can sliced black olives (optional)
1 packet taco seasoning
2-15 oz cans tomato sauce
Brown meat and veggies. Drain. Add all ingredients to pot or crock pot. Cook on medium til heated through, or in crockpot on low 5-6 hours or on high 3-4 hours.
(You can also brown the meat/veggies, cool then toss all the ingredients in a freezer bag and put it in the freezer. When you want to make it, thaw it, then put it in the crockpot. Easy Peasy!
Great served with cornbread, or with rice.
Sorry I don't have any pictures, I'll be honest it isn't the prettiest thing on the plate, but it is so good!
Have a blessed FOCUSed day!
Friday, June 25, 2010
Food Friday
Something we had that was out of the norm was Spaghetti, with spaghetti squash.
cut the spaghetti squash in half and back cut side down at 350 for about 45 minutes
I flipped them over to cool

then using a fork scrape the squash and break apart with your fingers to get the spaghetti

then make your favorite sauce (mine was from scratch). You could certainly use the squash on the plate first like you would with normal spaghetti, but because I made the squash in the morning I added it to the sauce to heat it through. I tried multiple times to get a photo that didn't look like regurgitated food without success, but as bad as it looks in the photo it really was delish. The kids both had 2 helpings the liked it so much.

So for a change in your everyday spaghetti, give spaghetti squash a try.
For my homemade quick sauce, I used tomato paste thinned out to the consistency I wanted with water, then I added, onion salt, basil, oregano, and thyme and mixed then cooked on medium heat for about 10 minutes to soften the herbs and let the flavor go through out. It was really good.! I didn't measure it was a just a toss it together kind of thing. Sometimes that's the only way to do it.
Enjoy and have a blessed day!
cut the spaghetti squash in half and back cut side down at 350 for about 45 minutes
I flipped them over to cool

then using a fork scrape the squash and break apart with your fingers to get the spaghetti

then make your favorite sauce (mine was from scratch). You could certainly use the squash on the plate first like you would with normal spaghetti, but because I made the squash in the morning I added it to the sauce to heat it through. I tried multiple times to get a photo that didn't look like regurgitated food without success, but as bad as it looks in the photo it really was delish. The kids both had 2 helpings the liked it so much.

So for a change in your everyday spaghetti, give spaghetti squash a try.
For my homemade quick sauce, I used tomato paste thinned out to the consistency I wanted with water, then I added, onion salt, basil, oregano, and thyme and mixed then cooked on medium heat for about 10 minutes to soften the herbs and let the flavor go through out. It was really good.! I didn't measure it was a just a toss it together kind of thing. Sometimes that's the only way to do it.
Enjoy and have a blessed day!
Friday, June 18, 2010
Food Friday
This week for food Friday is another favorite candy of mine. I have loved this candy for as long as I can remember. Now it is more readily available, but I remember it being at special places, like the when we were on vacation and at a candy shop.
It is Rock Crystal Candy

and again I pick up the red/pink/purple candies.
Wikipedia says this
Rock candy (also called rock sugar) is a type of confectionery mineral composed of relatively large sugar crystals. The candy is formed by allowing a supersaturated solution of sugar and water to crystallize onto a surface suitable for crystal nucleation, such as a string or stick. Heating the water before adding the sugar allows more sugar to dissolve and thus produces larger crystals. Crystals form after 6-7 days.
The part I like the least about about rock candy is the stick. I really dislike biting into wood. Altho the rock candy on a string is worse. I usually put my rock candy in a bag and beat it off the stick so I can eat it without the wood. I know I'm weird.
Do you have a favorite sugary candy?
Have a blessed day!
It is Rock Crystal Candy

and again I pick up the red/pink/purple candies.
Wikipedia says this
Rock candy (also called rock sugar) is a type of confectionery mineral composed of relatively large sugar crystals. The candy is formed by allowing a supersaturated solution of sugar and water to crystallize onto a surface suitable for crystal nucleation, such as a string or stick. Heating the water before adding the sugar allows more sugar to dissolve and thus produces larger crystals. Crystals form after 6-7 days.
The part I like the least about about rock candy is the stick. I really dislike biting into wood. Altho the rock candy on a string is worse. I usually put my rock candy in a bag and beat it off the stick so I can eat it without the wood. I know I'm weird.
Do you have a favorite sugary candy?
Have a blessed day!
Friday, June 11, 2010
Food Friday
Something completely unplanned which is why this wasn't up at 6 this morning SIS!! ha! I decided for the next couple of food Fridays I would share some candies with you that I LOVE LOVE LOVE!!
The first one is called Zotz. This is the info from Wikipedia
ZotZ is a candy with a fizzy, sour center. At first, it looks and tastes like a regular hard candy, but if it is bit into or a hole is opened, there is a sour powder that causes a sour fizzing. Zotz flavors include apple, cherry, watermelon, lemon, grape, and orange. It is manufactured by Ambrosoli in Italy.
This candy was introduced in the 1980's. and you can learn more here.

as you may notice from the photot I tend to like red and purple candies. Nothing like a good dose of really bad for you dyes to make your day better ha!! they come in packs of 4, and tho I don't really find them very sour they do fizz when you get to the center. Just from my personal experience the grape one's have the most fizz. Almost too much fizz actually. I did read that often cracker barrel's have them, but I got mine at Jungle Jim's. I almost always pick up some zotz when we are there.
I love some fun fizzy candy!
Have a blessed day!
The first one is called Zotz. This is the info from Wikipedia
ZotZ is a candy with a fizzy, sour center. At first, it looks and tastes like a regular hard candy, but if it is bit into or a hole is opened, there is a sour powder that causes a sour fizzing. Zotz flavors include apple, cherry, watermelon, lemon, grape, and orange. It is manufactured by Ambrosoli in Italy.
This candy was introduced in the 1980's. and you can learn more here.

as you may notice from the photot I tend to like red and purple candies. Nothing like a good dose of really bad for you dyes to make your day better ha!! they come in packs of 4, and tho I don't really find them very sour they do fizz when you get to the center. Just from my personal experience the grape one's have the most fizz. Almost too much fizz actually. I did read that often cracker barrel's have them, but I got mine at Jungle Jim's. I almost always pick up some zotz when we are there.
I love some fun fizzy candy!
Have a blessed day!
Friday, June 4, 2010
Food Friday
So this week was the last week of school and I saw some cute cupcake flowerpots here This was totally not my idea as you can see from the link, but I loved it and new I wanted to try it. I gave Rebecca a few different options for teacher gifts and this is what she chose. They were easy to make and so very very cute.

You'll need:
a flower pot (not plastic, as it needs some weight to hold the cupcakes)
dowel rods
styrofoam ball
aluminum foil
oreos
cupcakes
icing
star tip
leaf tip
Use a box mix and make your cupcakes.


I used 1/4 c. measurer to make even cupcakes, a little less batter would have been even better.


Mix up some buttercream icing to stiff consistency. I colored it with buttercup yellow, then once I had added the petals to all the cupcakes I added 2 tbsp. of cocoa powder so I could make chocolate buttercream centers.
Buttercream Icing
1 cup shortning
1 tbsp meringue powder (look in the cake aisle at walmart or at hobby lobby)
1/2 tsp butter flavor
1/2 tsp vanilla extract
2 drops of almond extract
4 cups of powdered sugar
4 tbsp warm water (add more as needed)
Mix the first 5 ingredients in your kitchenaide mixer (hand mixers do not hold up well to the stiff consistency of this icing) Add 1 tbsp of water, then add powder sugar a little at a time, alternating with water. once it is all mixed together when you stop the mixer the icing should stay in the whisk, but be able to be shaken out without a lot of difficulty. When it is at this stage turn the mixer back on and beat the icing for about 5 minutes on high. Add color and mix again. If it is not thick enough add more pdr sugar a little at a time, and if it is too thick add a touch more water.
To make chocolate butter cream at 2-4 tbsp of cocoa powder. I would start with 2 and taste and add, so you get a taste you like.
I added the color before adding the cocoa so the petals are regular buttercream and the centers are chocolate.
Cover the styrofoam ball with aluminum foil


place the ball in a flower pot


put crushed oreos over the aluminum foil for dirt.
place dowel rods in the ball. (use a skewer to make a hole in the cupcake, it makes it much easier to place the cupcakes on the dowels.

decorate the cupcakes.
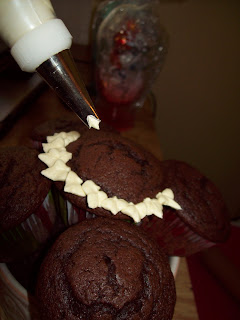


I did the petals first using a leaf tip, and then used a star tip to make the centers.


and you have an adorable gift to give. The flower pot was to hold a 4 inch flower. This is super easy and people will be amazed. Again this was not my idea, I saw it on another blog, but loved it immediately and wanted to give it a try.
Happy Baking!

You'll need:
a flower pot (not plastic, as it needs some weight to hold the cupcakes)
dowel rods
styrofoam ball
aluminum foil
oreos
cupcakes
icing
star tip
leaf tip
Use a box mix and make your cupcakes.


I used 1/4 c. measurer to make even cupcakes, a little less batter would have been even better.


Mix up some buttercream icing to stiff consistency. I colored it with buttercup yellow, then once I had added the petals to all the cupcakes I added 2 tbsp. of cocoa powder so I could make chocolate buttercream centers.
Buttercream Icing
1 cup shortning
1 tbsp meringue powder (look in the cake aisle at walmart or at hobby lobby)
1/2 tsp butter flavor
1/2 tsp vanilla extract
2 drops of almond extract
4 cups of powdered sugar
4 tbsp warm water (add more as needed)
Mix the first 5 ingredients in your kitchenaide mixer (hand mixers do not hold up well to the stiff consistency of this icing) Add 1 tbsp of water, then add powder sugar a little at a time, alternating with water. once it is all mixed together when you stop the mixer the icing should stay in the whisk, but be able to be shaken out without a lot of difficulty. When it is at this stage turn the mixer back on and beat the icing for about 5 minutes on high. Add color and mix again. If it is not thick enough add more pdr sugar a little at a time, and if it is too thick add a touch more water.
To make chocolate butter cream at 2-4 tbsp of cocoa powder. I would start with 2 and taste and add, so you get a taste you like.
I added the color before adding the cocoa so the petals are regular buttercream and the centers are chocolate.
Cover the styrofoam ball with aluminum foil


place the ball in a flower pot


put crushed oreos over the aluminum foil for dirt.
place dowel rods in the ball. (use a skewer to make a hole in the cupcake, it makes it much easier to place the cupcakes on the dowels.

decorate the cupcakes.


I did the petals first using a leaf tip, and then used a star tip to make the centers.


and you have an adorable gift to give. The flower pot was to hold a 4 inch flower. This is super easy and people will be amazed. Again this was not my idea, I saw it on another blog, but loved it immediately and wanted to give it a try.
Happy Baking!
Subscribe to:
Posts (Atom)